NATURAL RESOURCES COMMISSION
Information Bulletin #71
April 1, 2012
SUBJECT: Bioengineered Materials and Techniques for Public Freshwater Lakes, Rivers, and Streams
Landowners along public freshwater lakes often wish to employ shoreline protection. If a new seawall is to be placed in a significant wetland or along a natural shoreline, the seawall must be constructed of bioengineered materials pursuant to
312 IAC 11-4-2. In addition to these areas, bioengineered materials may be placed elsewhere along lake shorelines and can be especially useful along areas of special concern. "Bioengineered" is defined at
312 IAC 11-2-3 as "the use of a combination of biological elements (plant materials) and structural or mechanical reinforcements for stabilization, revetment, or erosion control. Biological and mechanical elements must function together in an integrated and complementary manner." The primary purpose of the information bulletin is to provide guidance for techniques to place and maintain bioengineered materials for shoreline protection in public freshwater lakes. Native plants must be used for the materials and techniques to be approved by the department. Care should be taken to ensure that non-native, invasive species are not included in purchased materials. Though not explicitly required by administrative rule, bioengineered materials can also be helpful to use in floodways on eroding banks of rivers and streams.
Bioengineering integrates live plant materials with structural support to create a living system capable of stabilizing shorelines or stream banks and providing erosion, sediment, and flood control. The integration and maintenance of the biological component is the critical feature of any bioengineered feature. Live plant materials provide additional benefits of landscape restoration and improved wildlife habitat.
The benefits of using bioengineering materials greatly outweigh those of traditional hard armor systems in many situations. Bioengineered areas can enhance the natural scenic beauty of the landscape and can improve fish and wildlife habitat. Traditional bank protection techniques require the use of heavy machinery that can cause detrimental impacts to sensitive areas, particularly increased erosion. In contrast, many bioengineered materials can be installed by hand or with smaller equipment. This advantage may be critical in steep areas where it is not possible to use heavy equipment. By reducing or eliminating the use of heavy machinery, lower project costs can result. In addition, most installation work with bioengineered materials can be done in the dormant season of late fall, winter, and early spring.
The greatest benefit of using bioengineering materials is long-term stability. Traditional erosion control systems are efficient for a period of time but often need to be replaced or repaired. With bioengineering, the plant systems can be established by the time the mechanical components begin to breakdown. As the system matures, the plants grow and their root systems bind the soil and any structural components. The plant systems can stabilize a bank long after the mechanical elements breakdown without the added cost of replacement.
The following information discusses common systems for the use of bioengineered materials to provide shoreline or stream bank protection. Not all systems are suitable for use at every site. For instance, bioengineered systems requiring woody plant growth need ample sunlight. A site must be properly assessed before choosing what is suitable to site conditions. Sites that are not experiencing erosion do not necessarily need any protection and can be left alone without assistance.
II. Types of Bioengineered Protection
Coconut fiber rolls, more commonly known as "coir logs", are cylindrical, log-like structures typically manufactured from coconut fiber wrapped with netting. Coir logs provide toe protection and protect slopes from undermining where scour is not severe. The log saturates with water soon after installation and can be planted with rooted plant stock of native species. The vegetation will be established when the log starts to disintegrate in a few years, leaving the bank protected (SMRC 2000).
Coir logs are one of the most commonly used erosion control products and can be used along streambanks, lakeshores, and wetlands. The logs fit into the curvature of the bank, providing maximum stability when properly installed. They are highly effective in lakeshore habitats with fluctuating levels because they encourage new vegetation in harsh conditions (USDA 1998).
Coir logs are typically twelve inches in diameter and can range in length from ten to 20 feet. In addition, coconut fiber mats can be purchased and then rolled into logs. Coir logs typically last around six to ten years (USDA 1998), depending on the manufacturer and specific log qualities.
Coir logs are relatively lightweight and can be installed by hand, though once waterlogged they become quite heavy. The use of live and dead stakes within the log helps secure them to the toe of the slope. Since installation requires little site disturbance, further erosion and sedimentation are prevented while adding toe protection. After vegetation has grown, the logs are barely visible and provide a natural-looking habitat. The rolls also trap sediment and create conditions beneficial for the establishment of native vegetation (USDA 1997).
For installation, a coir roll should be placed so the top of the roll is visible at a level that will not be topped by wave action. Once the log is in position, dead stakes are placed every four feet to hold it in place. If a significant amount of wave action or ice flow is possible, the log will need to be further secured by steel cable and duckbill anchors. Clean fill is placed behind the log. Rooted cuttings and plants can be placed in the installed log to further enhance the bank stability and improve aesthetics. To prevent washout, both ends of the log need to transition smoothly into the slope (Alaska Department of Fish and Game 2005).
1. A-Jacks
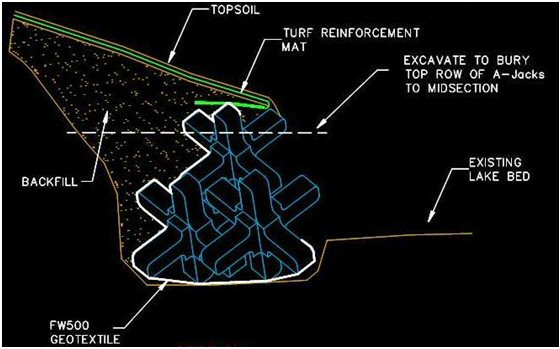
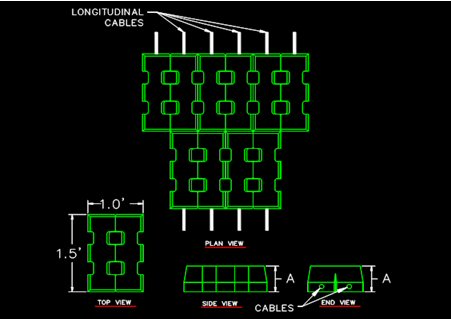
A-jacks blend the benefits of hard armor and vegetation, forming a matrix of stone and vegetation. Each A-jack unit consists of two symmetrical concrete halves that interlock to form a product similar in shape to childhood jacks. A-jacks are assembled at the worksite and then installed in the toe of a slope. This requires trenching the toe of the slope, generally deep enough to bury the bottom row of A-jacks to their midsection. A geotextile is placed in the trench first, behind where the A-jacks will be, in order to avoid piping of soil from behind the A-jacks.
Some A-jacks can be installed by hand but larger units require sizeable machinery to install due to their weight. Multiple rows of A-Jacks can be installed to form rows that interlock horizontally and vertically. When bare or sloped banks exist, means of sediment control must be in place during installation to prevent large sediment deposits from entering the water. After the A-jacks are in place, the sediment excavated prior to installation is used to backfill the rows and fill the voids. The area is then covered with topsoil, and planted or seeded with native plants.
A-jacks can be used in almost any location to address erosion, shoreline stabilization, bridge scour, and toe stabilization. They are particularly effective in areas of high velocity flows.
The greatest benefit to A-jacks is their overall mechanical strength while also being environmentally friendly. The voids allow native vegetation to become established and provide ideal aquatic habitat for many fish and invertebrates. Once vegetation has grown, most units are not visible. Also, they are an excellent alternative to riprap and usually require no regular maintenance (Murphy and Dreher 1996). Finally, they can be installed without disturbing the slope other than the toe (Wendt and Allen 2001).
The largest disadvantage of this system is finding an experienced contractor. Limited knowledge can lead to high labor costs, as it is more difficult and takes more time for the contractor to finish the job. While installation of the A-jacks is easy and can be done by hand, heavy machinery is usually needed to backfill the area and also to haul the units to the installation site. A backhoe with forks is needed to unload the pallets and the backhoe can also be used to lower the A-jacks to the installation site. Smaller equipment can be used to transport small numbers of A-jacks from a staging area to the installation site. This approach is particularly useful if working in tight quarters or if vegetation clearing would otherwise be needed to get the A-jacks to the site.
2. Concrete Blocks and Mats
Cellular concrete blocks form an interlocking system used to protect banks from erosion. Each block is uniform in size and weight and interlocks with other blocks to form a strong matrix. The flexibility allows for a variety of uses including shoreline protection. A layer of geotextile fabric on the underside of the matrix adds support to the system and improves drainage.

Cellular concrete blocks offer hard armor with voids to allow vegetation to become established, thereby providing wildlife habitat and an aesthetically pleasing condition. The blocks can be laid by hand which reduces additional site disturbance and allows their application in areas inaccessible to heavy machinery. The system provides a safe surface for pedestrians and wildlife.
Installation is best when done along evenly graded areas. Objects such as roots and stones should be removed and holes should be filled. Trenches are needed at the toe and the upper bank limit. Before the concrete blocks are laid, geotextile that is specific to the site needs to be placed. Blocks should be laid and interlocked starting at the bottom of the slope and continue until the desired protection has been achieved. Open cells are filled with sand, gravel, or soil, and the area is then seeded.
Articulated concrete mats use an interlocking concrete block matrix that is connected using a series of cables which forms a flexible structure. Similar to concrete blocks, a layer of geotextile fabric is first laid to add support to the system. This system provides the stability of hard armor, flexibility of erosion control mats, and the aesthetic, environmentally friendly aspect of other bioengineering techniques. The porosity of the system allows vegetation to grow. Banks are immediately protected upon installation. Articulated concrete mats are an economical alternative to riprap or other hard armor applications. The system is designed to be permanent and to minimize maintenance costs after installation.
Installation of articulated concrete mats is fairly simple but usually requires the use of a crane which could add to site disturbance. Cellular concrete blocks are laid by hand. A layer of geotextile should be placed on the installation site before placing either material and must be suitable for site conditions. Articulated concrete mats arrive onsite as a manufactured system. Mats are placed side by side and can be anchored with duckbill anchors for added stability. Above the ordinary high water line, the mats can be backfilled and seeded after installation to promote quicker vegetative growth. Mats are buried two blocks deep into the soil for toe protection (USDA 1996). To be effective and considered a bioengineered material, vegetation must be incorporated into the blocks or mats.
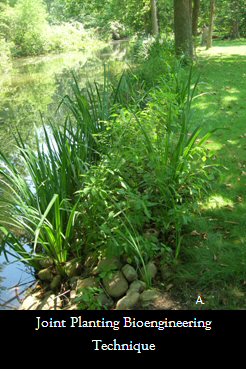
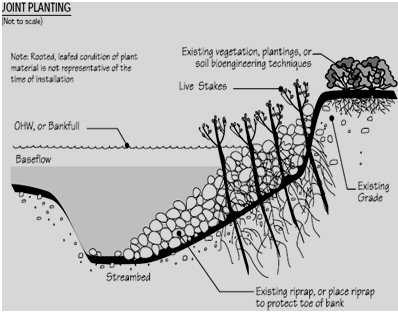
Joint plantings involve the use of live stakes with rock, such as riprap or glacial stone. The stakes are tamped down into the spaces between the rock where they will eventually root and sprout (USDA 1998). Once established, the vegetation creates a root mat under the rock that aids in erosion control. The plantings bind soil and rock together and help dry out the bank soil. This technique can be a relatively permanent resolution to recurring erosion from high velocity flows and is a common design for bioengineered seawalls along lake shorelines.
Once the stakes become established, they give the area a more natural look by covering some of the rock. As the system ages, sediment deposits occur, which provides additional area for plant establishment. Joint planting provides habitat where little to none would exist with riprap alone. Established plantings also improve water quality by creating shade over the water, resulting in cooler water temperatures.
Joint plantings also have engineering benefits. Rock alone dissipates much of the energy from high velocity flows created by flood stage events. Once vegetation is established, the plants further dissipate energy from the water. A system becomes stronger with maturation. (USDA 2000). With the system absorbing much of the energy that would otherwise cause erosion, bank protection increases substantially.
Joint planting can be done if rock is already in place (State of Georgia 2000). Not all riprap is conducive to planting, however. For instance, older riprap with a compacted base may prove difficult to penetrate. Finally, joint plantings can help deter vandalism. Established vegetation reduces visibility of the rock and the integration of roots and rocks make it difficult to move any stones. Once in place, the system requires little upkeep.
Installation is relatively simple, although heavy machinery may be required to install the riprap. Riprap needs to be loosely dumped or hand placed and no thicker than two to three feet. Hand laying the rock is best, but not always feasible (State of Georgia 2000). Once rocks are in place, stakes can be tamped into the voids between them. If hand laying, stakes can be placed in conjunction with the riprap. The growing ends of the stakes need to protrude slightly above the rock and be long enough to extend into the dry season water level. The stakes can be placed in a random arrangement although a diamond or grid pattern with stakes spaced three feet apart is common.
The survival rate of live stakes typically varies from 30% to 50% (USDA 2002). The low survival rate may be attributed to dry soil or shallow plant installations. Survival rates can be enhanced through irrigation (especially during the first year) or compensated by a high number of plantings. Also, plants take at least a year to become established, and success is restricted to species capable of growing in this type of environment. The use of live stakes limits the time of year the system can be used, as stakes need to be installed when they are dormant.
Live fascines are long plant bundles placed into trenches in a stream bank, parallel to stream flow. Species in these bundles are similar to those used in live stakes and eventually develop a root system that protects the soil from erosion (State of Georgia 2000). The branch cuttings are tied together with twine in a cylindrical fashion. Once placed in the trench, fascines trap and collect soil on the streambank.
Advantages of this technique include immediate reduction of surface erosion as the bundles and trenches collect runoff before sprouting has occurred. Also, if properly installed, site disturbance can be kept to a minimum. The increased stability provided from this technique allows additional native vegetation to become established which enhances erosion control while the fascines take root. If installed at a sufficient angle, the bundles aid in drainage which also provides added soil stability. This technique requires plenty of moisture during the growing season.
For added stability, live fascines are often used with other bioengineering techniques. Live stakes help stabilize the fascine and provide additional woody vegetation. Dead stout stakes made from untreated lumber also hold the fascines in place to prevent washout. Seeding between each trench aids in site stabilization. To prevent erosion of loose soils while a fascine is rooting, geotextile fabric can be used along the bank and under each fascine.
Similar to live stakes, fascines need to be collected and prepared as soon as possible to the time of installation. A site where the woody materials are readily available is best. For dry slopes, a shallow contour trench parallel to flow is necessary. On wet slopes, the trenches need to be placed at an angle to prevent sliding. The trench is dug at the proper contour ten inches deep and ten inches wide and is placed up the slope three to five feet apart. The trenches should extend one or two rows over the top of the bank.
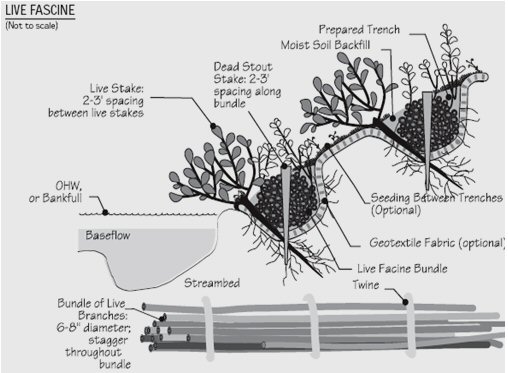
First, place a geotextile along the banks and in the trenches. Next, starting at the trench closest to the toe of the slope, place the fascines into the trench, using soil from the next trench to lightly cover the bundle. The top of the bundle should be somewhat visible after backfilling. Dead stakes are installed directly though the fascine, and live stakes are placed on the down slope side of the bundle (USDA 2002). Finally, the area between each fascine is seeded to prevent erosion during establishment.
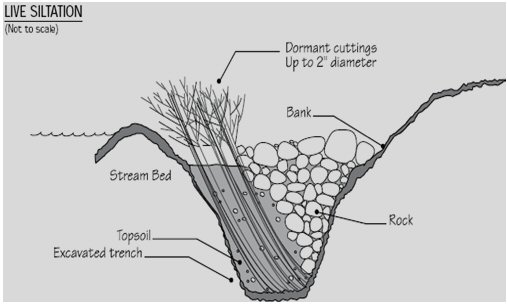
Live siltation is a two-fold system for the placement of bioengineered materials. Live siltation secures the toe of the slope and collects sediment to create aquatic habitat (Hoyer 2002). The system revegetates the toe of the slope and provides armor for additional protection. A trench is dug to help collect sediment. A layer of gravel, small rock, and soil are placed in the bottom to hold cuttings in place until they are established (USDA 2002). Both live and dead branch cuttings are placed in the trench, adding immediate stability. Fish cover and habitat are also immediately enhanced. The system encourages deposition of sediment into the trench; the sediment is trapped by the branches and leaves of the cuttings.
Live siltation can be used on streams and lake shores in battling erosion from wind and waves. Usually installed on inner bends, the technique can be modified for outer bends with additional scour and toe protection. As with other techniques that use live cuttings, species that easily root must be used, but any woody branches are acceptable for dead cuttings. The live and dead branches supply a roughness element, slowing the water velocity and promoting sedimentation (Hoyer 2002).
Many advantages are presented with live siltation. The largest of these is habitat improvement and restoration. Fish habitat is immediately present upon installation, and the addition of riparian habitat enhances the area for other wildlife as well. Sedimentation and bank stabilization provide areas favorable for establishment of native vegetation. The roots of the cuttings help to stabilize and dry out the soil. The roots also add resistance to sliding and shear displacement. When plantings are being used on the bank, this technique helps protect the rooted stock by acting as a barrier (USDA 2002). Live siltation is often used in addition to other methods.
Installation can only occur in areas with shallow water and slope, or the trench will be ineffective. Also, the installation site must be in an area of low velocity flow to prevent washout. The trench needs to be placed properly (Hoyer 2002) above the ordinary high water mark. Installation season is limited due to the use of dormant cuttings.
The system should be installed perpendicular to wind and waves and follow the contour of the bank (USDA 1998). The trench can be dug by hand or backhoe and should be two feet deep. A minimum of 40 branches per yard are placed, bud ends up, in the trench leaning towards the stream. One-third of each branch is exposed. Soil is added, as well as gravel and small rock. Topping the trench with large rocks assists in preventing washout. Other bioengineered materials such as coconut fiber logs or fascines can also be used with the larger rocks (USDA 2002).
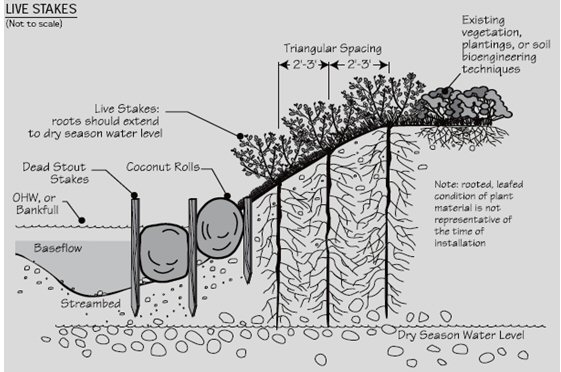
Bioengineering through the use of live stakes involves the planting of dormant cuttings from plant species known to root quickly and effectively (State of Georgia 2000). These stakes, absent of twigs or leaves, are tamped directly into the streambank soil (USDA 2002). Soil stabilization occurs as the roots bind the soil and draw moisture from the soil. Vegetation also increases and enhances streamside habitat for aquatic and terrestrial species.
Live stakes are best used in an area where moist soil will be available throughout the growing season. Stakes must be used soon after cutting to ensure proper root development and overall survival and growth. During transport from the collection site to the installation area, the cut stakes need to be kept in a cool, moist environment. A construction location where the stakes are able to be cut onsite is ideal.
Live stakes are often used to save time and money on a site that only needs minor erosion control. Installation is rather simple. Stakes range from one to two inches in diameter and two to three feet long, with length dependent on the dry season water level and the cutting source. Various dogwood and willow species are the most commonly used plants for live stakes. Only species native to the area are to be used. These species not only root quickly, but also provide a strong root system to effectively stabilize the soil. All leaves and branches need to be removed before installation, but bark should be left intact to assist the stake in moisture retention. Cutting the basal end at a sharp angle and leaving the top of the branch square aids installation. Stakes are tamped using a dead blow hammer with the buds facing up, inserting the live stake 4/5 of the way into the ground at a slightly downstream angle. Spacing should be a triangular pattern with stakes two to three feet apart. If the soil is tightly packed, the stake can be inserted by digging a hole rather than tamping, as compacted soil can cause the stake to split and become ineffective. Covering an area with jute mesh or geotextile fabric aids stability until roots are established.
Live stakes can be installed in conjunction with other bioengineering materials, such as geotextile fabric, coconut fiber logs, and live fascines. If a streambank is exceptionally prone to erosion, laying geotextile with the live stakes helps control erosion while the live stakes take root. Live posts are quite similar to live stakes, only live posts are much larger (USDA 2002).
G. Rolled Erosion Control Products (RECPs)
Rolled erosion control products (RECPs) include turf reinforcement mats (TRMs), erosion control blankets (ECBs), and similar geotextiles manufactured to provide bank stabilization and prevent erosion. Generally, they are blankets of organic mulch distributed between fiber netting that is a photodegradable polypropylene, a biodegradable natural fiber netting, or a more permanent material such as polyethylene or polyvinyl chloride that has ultra violet stabilizers. Organic mulch includes straw, excelsior, coconut fiber, or any combination of these. Before installation, the site should be evaluated to determine the best RECP for the situation.
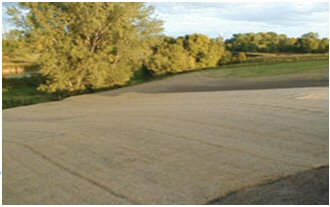
Rolled erosion control products provide numerous benefits: immediate bank protection and stabilization; protection of vegetation as it becomes established; providing a stable microclimate for enhanced growth; and increased soil infiltration which promotes improved drainage and vegetation growth. These materials are often used in conjunction with other bioengineered materials such as A-jacks and live fascines.
Rolled erosion control products can be used on a variety of sites. In many areas, slopes are too steep for a simple hydroseeding method to be effective. The use of an RECP in such areas provides a method to anchor the mulch to the soil to reduce runoff and help vegetation establishment. These mats and blankets prove most effective on slopes steeper than 3:1 and where the threat of erosion is high.
In most cases, seeding should occur before the installment of an RECP. Follow manufacturer directions for installation. Installation of the material includes a six inch by six inch trench at the top of the slope to anchor the mat. After backfilling and tamping the trench, the mat is unrolled down the slope to the water line. A trench is also required at the toe of the slope in order to prevent water from getting under the material. When laying the next roll, there should be two to three inches of overlap, with the blanket on the upstream side on top. The blankets need to be laid loosely but remain in complete contact with the soil and secured following manufacturer specifications.
Geotextiles are a type of RECP that do not contain the layers of materials found in ECBs and TRMs but still allow water infiltration and erosion control. They provide excellent erosion control and are commonly used in conjunction with other techniques, like joint planting, A-jacks, and vegetated geogrids.
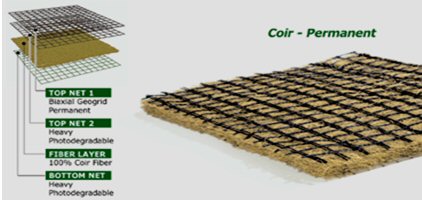
Turf reinforcement mats (TRMs) are manufactured coverings used to provide bank stabilization and prevent erosion. Generally, they are blankets of organic mulch distributed between fiber netting. The netting can be photodegradable polypropylene, a biodegradable natural fiber netting, or a more permanent material such as polyethylene or polyvinyl chloride that has ultra violet stabilizers. Organic mulch includes straw, excelsior, coconut fiber, or any combination of these. Before installation, a site must be evaluated to assess the amount of protection needed and to ensure the correct mat is used.
Turf reinforcement mats provide immediate bank protection and stabilization. They reinforce the root system of the vegetation on the bank while providing a stable microclimate for enhanced growth. TRMs protect banks from rainfall impact which can lead to surface erosion. The mats can increase infiltration and therefore promote vegetative growth by improving drainage. TRMs protect seedlings from birds and other animals and are often used in conjunction with other bioengineering techniques such as A-jacks and live fascines.
Turf reinforcement mats can be used on a variety of sites. In many areas, slopes are too steep for simple hydroseeding to be effective. The use of a TRM provides a method to anchor the mulch to the soil to reduce runoff and help vegetation establishment. These mats are most effective on slopes steeper than 3:1 and where the threat of erosion is high. The mats are also effective in areas where the soils are already disturbed and vegetative growth may be slow.
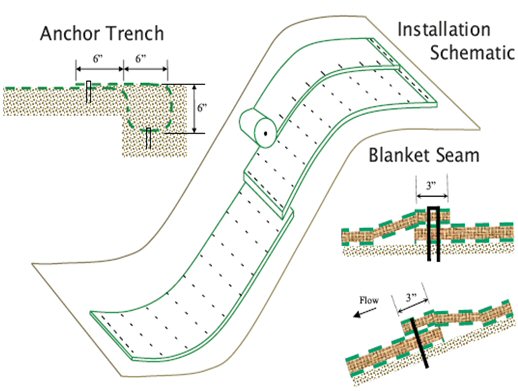
Typically, seeding should occur before the installment of the turf reinforcement mat. At the top of the slope, a six inch by six inch trench is needed to anchor the mat. After backfilling and tamping the trench, the mat is unrolled down the slope to the water line. When laying the next roll, there should be two to three inches of overlap, with the TRM on the upstream side on top. The blankets need to be laid loosely but remain in complete contact with the soil and secured following manufacturer specifications.
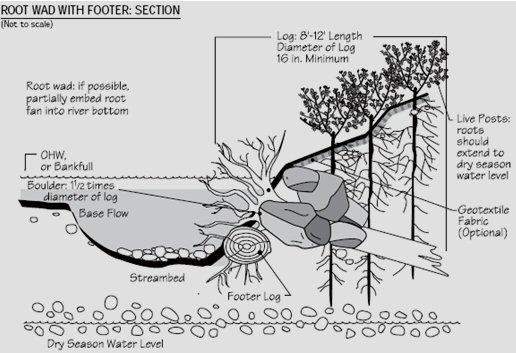
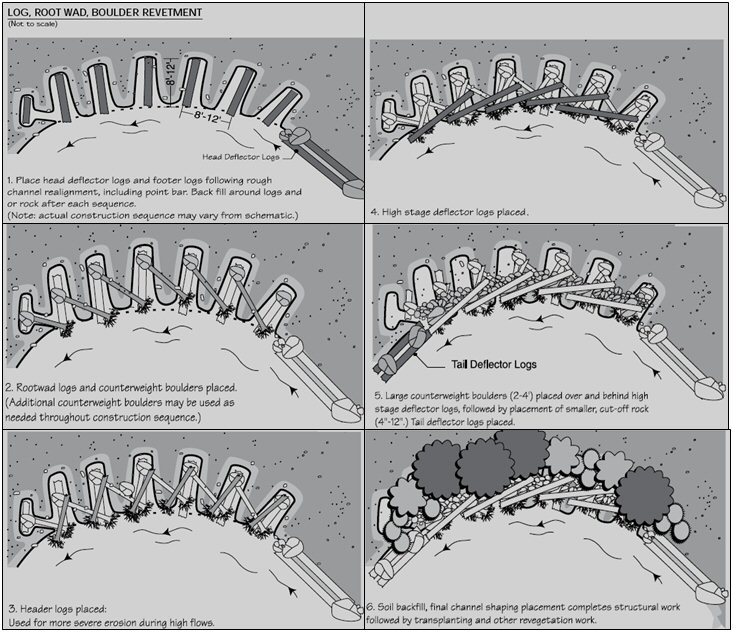
Another bioengineered material is a large root wad of a tree placed in the bank to protect the slope toe. Root wads should only be used in conjunction with other bioengineered materials for bank stabilization (Harman and Smith 2002). The root wad displaces the current away from the bank, which slows the rate of erosion. In addition, sediment collects behind the wad and helps restore the bank.
Root wads can be used on streams and lakes, but only certain species of trees are acceptable for use. Douglas fir, oak, hard maple, juniper, spruce, cedar, red pine, white pine, larch, or beech all have durable wood that can withstand high velocity flows; native species must be used.
With proper placement, root wads provide immediate protection following installation. They must be installed at the toe of the slope for protection and restoration. For highest efficiency, install wads where the primary flow vectors intersect the bank at acute or right angles, as this is often where the highest rates of erosion occur. Root wads can be placed in meandering streams (Harman and Smith 2002). On bends, overlapping of root wads is not necessary along the entire bend.
Root wads offer excellent habitat for insects and fish, as they provide overhead cover, resting areas, and shelter. This enhanced habitat improves fish spawning and rearing habitats; wads are often used in streams with fish habitat deficiencies in hopes of assisting in habitat and species recovery (USDA 2002).
To begin installation, a twelve (12) to 18 foot long footer log is placed at the toe of the eroding bank. Placement is at the expected scour depth, slightly angled away from the direction of flow. Boulders placed along the footer log help to hold it in place. Root wads need to be installed so the primary brace roots are facing upstream, flush with the bank at a 30% to 45% angle to the bank. The wads are either driven or trenched into this position and must be perpendicular to any waves. Once installed, the wad should be below the ordinary high water mark. The area is then backfilled and live stakes or posts can be installed on the bank (USDA 2002).
Most root wads are quite large and require heavy machinery for installation, which can cause increased stream sedimentation (Alaska Department of Fish and Game 2005). Use is also site-limited. If undercutting is likely, root wads should not be used. Also, they cannot be used in braided streams or with sandy or silty soil. Regular monitoring is required since they can decay or become damaged (MDE 2000).
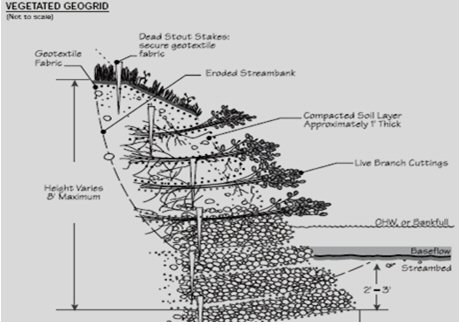
A vegetated geogrid (including a "soil lift", "fabric encapsulated soil" or "live soft gabion") consists of alternating layers of live cuttings and compacted soil wrapped in a geotextile (MassDEP 2006). The bioengineered material is used if needed to rebuild a bank (USDA 2002), especially along steeply eroded streambanks or if needed to configure new banks in a realignment situation (USDA 1998). Vegetated geogrids are also helpful in restoring outside bends (MassDEP 2006).
Vegetated geogrids are immediately effective because the lifts protect the bank before the vegetation is established. Once the cuttings have established, the entire system increases in strength and becomes even more effective. The geogrids themselves trap sediment which helps to restore the bank, as well as improve water quality.
The use of vegetated geogrids is very similar to branch packing. Their applications and effectiveness are similar, as are the necessary materials. Both involve soil, live stakes, dead stakes, and toe protection and are installed similarly. The main difference is the use of geotextile with the vegetated geogrid. Also, vegetated geogrids can tolerate higher velocity flows and can be used on steeper, higher slopes than branch layering (MassDEP 2006).
Installation should be limited to streambanks or lakeshores with a 1:1 slope and can used above and below the ordinary high water mark. A rock toe protection needs to be installed first by digging a trench that is two to three feet below the streambed and should be three to four feet wide. Next, a layer of biodegradable erosion control fabric is laid in the bottom of the trench which is filled twelve inches deep with two to three inch diameter rocks. The fabric is folded over the rock and staked. Rock-filled geogrids should extend up to the ordinary high water mark.
Along the top of the uppermost rock-filled geogrid, place a layer of branch cuttings (typically willow or dogwood). The branches should be covered with a layer of soil until most of the stems are covered. This is then covered with geotextile, creating a new lift staked together with live stakes. After each lift is installed, a new layer of cuttings is placed before a new lift is created. The total system height must not exceed eight feet (USDA 2002).
This highly effective system does have disadvantages. First, a large amount of materials is required. Geotextiles, live and dead stakes, and plantings need to be placed on the top of the slope as well as in each individual lift. Heavy equipment is also necessary to excavate a base trench and to backfill. The technique can be expensive in certain situations but the results are high quality and long lasting. Installation should be done during low flow conditions, as toe protection needs to be installed (USDA 2002). Dormant cuttings need to be available, which are limited to certain times of the year.
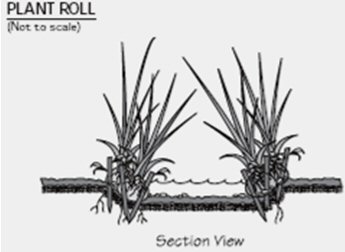
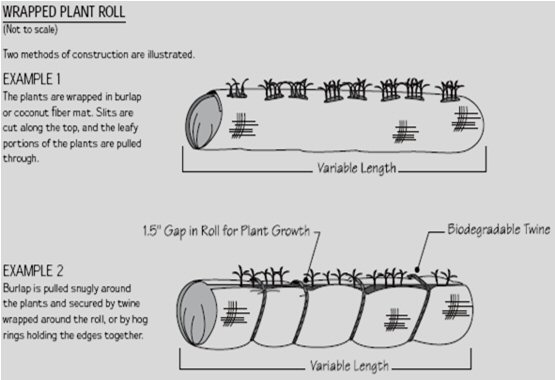
Plant rolls introduce already established vegetation to eroded sites and can be constructed in a number of ways. Wrapped plant rolls consist of clumps of plants placed in sod and tightly wrapped into a sausage-like roll held together with twine and burlap, similar to a coir roll (USDA 2002). The rolls are usually about ten inches in diameter and can be two to 15 feet long. They are suitable for stream and lakeshore areas and are constructed directly onsite. Individual plants can be wrapped with burlap and twine to create individual plant bags. Plant rolls and bags can be used alone or in conjunction with other types of bioengineering techniques such as brush mattresses.
Ideal places for plant rolls are in areas where rapid repair of minor damage is needed. Many native species can grow in a plant roll, including many species of sedges, rushes, and grasses. Rolls are ideal where these types of plants normally grow. Unlike seeding, plant rolls can withstand areas of fluctuating water. Because rolls collect sediment and improve the microclimate, native species can easily become established and survive around a roll. Rolls offer immediate toe protection.
A trench two inches wider and deeper than the roll needs to be dug along the shoreline. Rolls can be constructed either in the trench or on the bank and then rolled into the trench. A two to three foot wide strip of geotextile is laid in the trench under a one inch layer of topsoil, with the roll placed on top of the geotextile. Plants should be placed twelve inches apart in the trench, and then covered and compacted with highly organic topsoil. To prevent washout, the ends need to be wrapped and tied with geotextile. The geotextile fabric is then wrapped from each side, overlapping at the top. To expose the plants, slits are cut in the top of the roll. Anchoring is done with dead stout stakes. For lakeshores, additional trenches should be dug three to six feet apart toward the shoreline in order to create a staggering spacing pattern (USDA 2002).
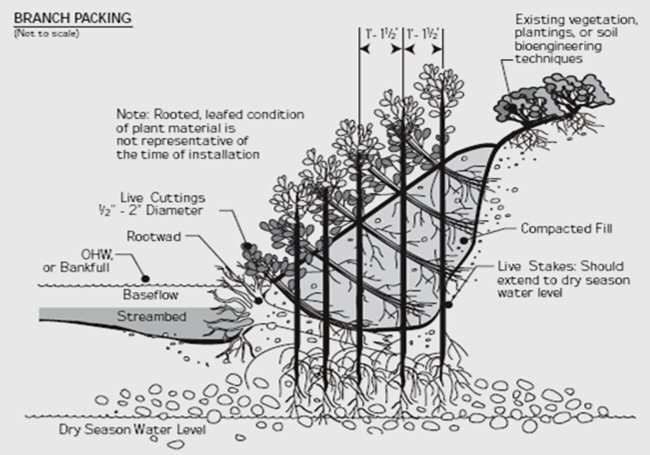
Branch packing is a bioengineering technique consisting of alternating layers of live branches and compacted backfill. This system is an effective and relatively inexpensive way to fill small, localized holes and gullies. The bank gains immediate soil reinforcement from the branches and additional protection as the vegetation quickly becomes established. Existing holes should not be larger than two to four feet in width and four feet deep (USDA 2002).

Branch packing quickly establishes a vegetated bank to prevent runoff and contain erosion. The branches trap sediment while the roots stabilize and dry out the soil. As the vegetation grows, efficiency increases because plant leaves reduce soil runoff that can result from the impact of rain.
The bottom of the hole is dug out at or below the streambed. A layer of rock or a root wad should be placed at the bottom of the hole and covered with two to four inches of soil. Live stakes are placed three to four feet in the ground starting at the lowest part of the hole. Live branches are placed perpendicular to the slope face in the hole in a crisscross configuration, following each layer of branches with a layer of compacted soil (USDA 2002).
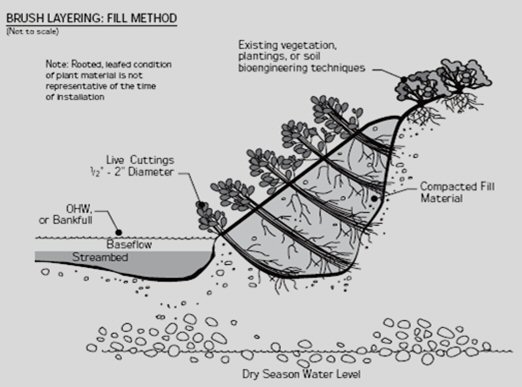
Brush layering uses both soil and layers of cuttings to stabilize and revegetate streambanks. Cuttings are laid on horizontal benches of the slope, which can be the existing slope or one modified with fill. The technique is very similar to vegetated geogrids without the use of geotextiles. As with vegetated geogrids, plantings cut the bank into shorter sections with a brush layer in between to contain runoff. The cuttings can be dormant or rooted. A much larger species list can be utilized when rooted stock is used, as species that do not readily root can be inserted into the bank (Alaska Department of Fish and Game 2005). A higher density of plantings is needed for areas with a high flow velocity (USDA 2002).
The plantings impede runoff by reducing surface erosion and trap debris. The high number of plantings quickly dries out excessively wet slopes to add stabilization and increased bank stability allows additional vegetation to become established (USDA 2002). Vegetation leads to added habitat for fish and wildlife.
Brush layering can be relatively expensive and labor intensive. Brush layering is a more technologically advanced process compared to many other bioengineering techniques, so finding contractors who are familiar with the process may be difficult. Also, if large amounts of fill are to be used, heavy machinery is needed which can lead to high levels of siltation (Alaska Department of Fish and Game 2005). When bare or sloped banks exist, sediment control is necessary during installation to prevent large sediment deposits from entering the water.
Cuttings should be 0.5 to 2 inches in diameter and long enough to reach the back of the bench to allow rooting. When using the existing slope the bench should be two to three feet deep and slightly angled down into the slope. If a fill slope is used, the plantings can be laid as fill is placed. The brush layer should be placed relatively perpendicular to the water body. Similar to live fascines, construction should begin closest to the water and proceed upward.
Benches are sloped so the outside edge is higher than the inside. Cuttings are laid in a crisscross pattern on the bench in groups of 20 to 25 cuttings per yard with one quarter of the cutting hanging over the bench. Two to four inches of fill are placed around the cuttings, using the earth excavated from the bench. The area needs to be seeded and mulched once the layers are in place. If water flowing over the bank was a cause of the erosion, the water needs to be diverted from the area until vegetation is established (USDA 2002).
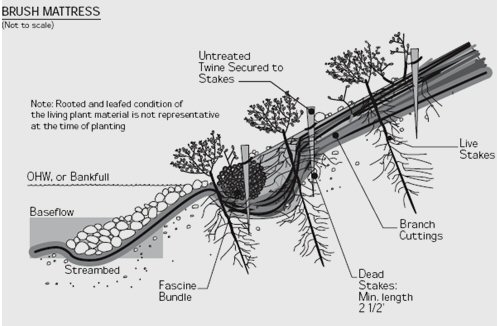
A brush mattress involves live branch cuttings, toe stabilization, live stakes, fascines, dead stakes, twine, and soil. With this technique, a heavy layer of dormant branches is laid in a crisscrossing pattern and secured to the bank with dead posts and twine. Live stakes are also installed for added protection and vegetation. Soil covers the branches and all live stakes must be covered to ensure growth. Toe protection is also a must for added stabilization, and can include rock, root wads, coconut fiber logs, or tree revetments, depending on the situation. Once the cuttings and stakes have sprouted, the extensive vegetation provides bank protection (Allen and Fischenich 2000).
This technique provides multiple advantages, including immediate bank coverage. The interlocking mattress created through the intertwined cuttings forms a protective layer over the bank following installation (USDA 2002). The cuttings start slowing velocities, collecting sediment, and providing habitat before they are fully established and also collect sediment during flood conditions (Allen and Fischenich 2000). Additional native species often become established over time and all the vegetation restores the riparian environment, thereby enhancing the area for wildlife and aquatic life (USDA 2002). Sediment collection can also reduce non-point source pollution by intercepting contaminants before they reach the water (Allen and Fischenich 2000).
Brush mattresses are only suitable for stable slopes with a 2:1 maximum slope and should be installed just above the ordinary high water mark. Branches should be six to nine feet long and one inch in diameter. Eight to twelve inches are needed for toe anchoring, and the cuttings need to have some flexibility to conform to the slope face. The bank should be graded to the angle of repose. A trench is needed near the toe to hold the basal ends of the cuttings as well as a live fascine. Live and dead stakes should be placed evenly across the mattress, ensuring the live stakes are deep enough to reach the dry season water table. Cuttings are placed in a crisscross pattern four to six inches thick with basal ends in the trench. When placing the cuttings, the basal ends must be covered with soil capable of retaining enough moisture for growth. After the cuttings are laid, stretch twine throughout the dead stakes, wrapping it tightly around each stake. Once the twine is in place, the stakes should be tamped into the ground until the twine is tight against the slope. A live fascine should then be placed in the trench and secured with dead stakes and all slope voids should be filled with a thin layer of soil (USDA 2002).
Because many materials need to be collected immediately before construction, the technique can be complicated and labor intensive. Live stakes, dead stakes, and live fascines are needed, and root wads, tree revetments, or coconut fiber logs are recommended for toe protection. Cuttings must be dormant, meaning construction of the system can only occur during a specific season, usually September to March (USDA 2002).
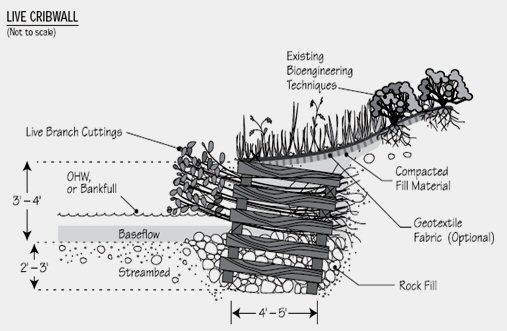
A live cribwall is a technique in which an engineered material is constructed into a streambank consisting of untreated logs or timber built in a log cabin-like arrangement (USDA 2002). The structure is filled with rock, soil, and plantings. The live branch cuttings are placed through the structure and take root, stabilizing the soil by drying out the bank and forming a strong root matrix. The rocks help prevent future erosion and provide prime habitat for aquatic species. The timbers provide immediate erosion protection, while the cuttings and rocks will protect the streambank after the logs have deteriorated.
Live cribwalls are most effective when used on virtually vertical banks, including areas where regrading the slope does not exist (USDA 1998). If regrading is feasible, cribwalls can be installed as a low wall to serve as toe protection. Cribwalls can be used on the outside bends of streams with high velocity flow but additional rocks may need to be placed in front of the cribwall to provide added toe protection (USDA 1996). Live cribwalls are also used in areas where it is possible for erosion to form split channels (USDA 2002).
Cribwalls are advantageous in the above situations and provide a rather natural appearance once the cuttings are established. Due to the large amount of materials (especially lumber) needed for construction, and the labor involved, live cribwalls can be expensive. Cribwalls are constructed onsite, the rocks and cuttings are hand placed and the area backfilled. Installation can only occur during low water flow (USDA 1998).
Live, dormant branch cuttings should range in size from 0.5 to 2.5 inches in diameter, be long enough to reach the back of the cribwall, and be of species that root well, such as dogwoods and willows. The streambank needs to be excavated two to three feet below the existing streambed until a stable foundation of five to six feet can be established. The back of the foundation is excavated six to twelve inches lower than the front so the cribwall is tilted to aid in stability. Logs are constructed in a stacking pattern where the sides overlap perpendicularly, as in a log cabin, and reinforced through nailing. After a cribwall is constructed and in place, rock is lowered to the existing streambed. If added toe protection is needed, additional rocks can be placed in front of the wall. Next, a layer of cuttings is placed through the cribwall, followed by fill dirt. Layers of cuttings and earth are placed at each course in the cribwall until the top of the structure is reached. The system is covered with fill and the soil compacted to help prevent erosion while the plantings become established (USDA 2002). Walls should be no taller than seven feet and shorter than 20 feet in length (USDA 1996).
O. Tree Revetments and Log, Root Wad and Boulder Revetments
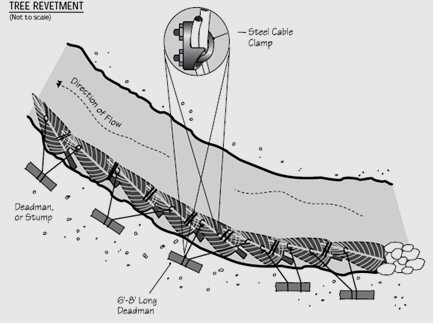
Tree revetments are bioengineering techniques involving the placement of whole trees cabled together and anchored to the bank for armoring. The root wads are removed while the branches are left in place. Tree revetments where the branches have been removed are also known as "log revetments". This system is a rather inexpensive technique that can be constructed with readily available materials (USDA 2002).
The purpose of tree revetments is to slow the velocity of water hitting the banks while also collecting sediment along the banks. Revetments assist in slowing erosion to give vegetation the time it needs to establish and begin permanently stabilizing the bank. Sedimentation provides a fertile seedbed for colonization of native vegetation (USDA 1998). Rooted vegetation stabilizes the bank and remains long after the trees rot away, providing more permanent stabilization (Goard 2006). The branches not only slow flow and collect sediment, but also provide ideal fish habitat and wildlife cover (USDA 2002). Tree revetments require periodic maintenance to replace trees that have been damaged or have started deteriorating before the vegetation along the bank is established. Additionally, as the trees deteriorate, the steel cables used in the system must be removed.
Tree revetments are usually placed on the outsides of small to medium velocity bends where vegetation has been removed and the banks are exposed (Goard 2006). A tree revetment cannot be placed upstream of bridges or other structures capable of being damaged because the revetment can washout during heavy flooding or heavy ice flow (USDA 2002, USDA 1998).
Trees should be laid along the banks with the tree tops pointing downstream, with each tree overlapping its neighbor by one-third. Upstream and downstream ends need to be keyed into the bank to prevent further erosion. Trees can be anchored in one of two ways. In the first method, trees are placed in the bottom of the streambed, cabled together, the cable is wrapped around the tree, ends placed through the clamp, and then the cable is cinched down and tightened. In the second method, the steps for tying the trees together are the same, but the system as a whole is installed differently. After the cable is cinched and tied down, t-posts are installed on the landward side of the trees, with a rope tied around the trees and the t-posts. All are lowered into the water as one system. The rope holds the trees in place so that the anchor cable and log cable can be clamped together and then cinched. Christmas trees are commonly used to create a revetment. Duckbill anchors are used to hold the revetment into the bank. T-posts are used with smaller tress for a better hold (USDA 2002).
Log, root wad, and boulder revetments are a combination of bioengineered materials using the ideas from log revetments and boulder revetments. This technique is often used when added erosion protection is needed (USDA 2002).
Alaska Department of Fish and Game. 2005. Streambank Revegetation and Protection: A Guide for Alaska Revised 2005. Alaska Department of Fish and Game, Division of Sport Fish.
Allen, Hollis H. and Craig Fischenich. 2000. Brush Mattresses for Streambank Erosion Control. EMRRP Technical Notes Collection (TN EMRRP-SR-23), U.S. Army Engineer Research and Development Center, Vicksburg, MS.
Goard, Deborah. 2006. Riparian Forest Best Management Practices: Tree Revetments. Publication MF-2750. Kansas State University Agricultural Experiment Station and Cooperative Extension.
Harman, William A. and Rachel Smith. 2002. Fact Sheet Number 4: Using Root Wads and Rock Vanes for Streambank Stabilization. River Course. Publication AG-590-4. North Carolina Cooperative Extension Service.
Hoyer, Daria. 2002. Live Siltation Biotech Tip. Erosion Control. July/August 2002, Forester Media, Inc.
Maryland Department of the Environment (MDE). 2000. Section 2: Soil Protection and Stabilization Techniques. Waterway Construction Guidelines. Maryland Department of the Environment, Water Management Administration.
Massachusetts Department or Environmental Protection (MassDEP). 2006. Chapter 8: Stream Corridor and Shoreline Restoration. Massachusetts Nonpoint Source Pollution Management Manual. Geosytec Consultants.
Murphy, Michael and Dennis Dreher. 1996. Shoreline stabilization: bioengineering alternatives. Lake Notes. Illinois Environmental Protection Agency.
State of Georgia. 2000. Guidelines for streambank stabilization. GA: State of Georgia, Georgia Soil and Water Conservation Commission.
United States Department of Agriculture, Natural Resources Conservation Service. 1996. Chapter 16 Streambank and Shoreline Protection. Engineering Field Handbook. Part 650. Washington, D.C. U.S. Department of Agriculture, Natural Resources Conservation Service.
United States Department of Agriculture, Natural Resources Conservation Service. 1997. The Native Plant Guide for Streams and Stormwater Facilities in Northeastern Illinois. U.S. Department of Agriculture, Natural Resources Conservation Service, Chicago Metro Urban and Community and Assistance Office.
United States Department of Agriculture. 1998. Stream Corridor Restoration: Principles, Processes, and Practices. Federal Interagency Stream Restoration Working Group. GPO Item No. 0120-A. Washington, D.C., U.S. Department of Agriculture.
United States Department of Agriculture, Forest Service. 2000. Soil Bioengineering An Alternative for Roadside Management. 7700 Transportation Management. San Dimas, CA. U.S. Department of Agriculture, Forest Service, Technology and Development Program.
United States Department of Agriculture, Forest Service. 2002. A Soil Bioengineering Guide for Streambank and Lakeshore Stabilization. Publication FS-683. San Dimas, CA. U.S. Department of Agriculture, Forest Service, Technology and Development Program.
Wendt, Cathy J. and Hollis H. Allen. 2001. Archaeological site and reservoir shoreline stabilization using wetland plants and bioengineering, Rice Reservoir, Wisconsin. Water Quality Technical Notes Collection (ERDC WQTN-CS-02), U.S. Army Engineer Research and Development Center, Vicksburg, MS.
| | | | | |
| Native Shoreline and Wetland Plants |
| Grasses/Sedges | Common Name | Height | Means Sold |
| Scientific Name | Seed | Plant | Both |
| Carex comosa | Bristly Sedge | 2-3' | | | X |
| Carex frankii | Frank's Sedge | 1-2' | | | X |
| Carex lacustris | Hairy Sedge | 2-4' | | | X |
| Carex lurida | Shallow Sedge | 2-3' | | | X |
| Carex vulpinoidea | Brown Fox Sedge | 2-3' | | | X |
| Eleocharis obtusa | Blunt Spikerush | 1-2' | | | X |
| Eleocharis palustris | Spikerush | 1-2' | | | X |
| Elymus virginicus | Virginia Wildrye | 2-4' | | | X |
| Glyceria striata | Fowl Mannagrass | 1-5' | | | X |
| Juncus effusus | Common Rush | 1-4' | | | X |
| Juncus torreyi | Torrey's Rush | 1-2' | | X | |
| Leersia oryzoides | Rice Cutgrass | 2-4' | | | X |
| Panicum virgatum | Switch Grass | 3-5' | | | X |
| Schoenoplectus fluviatilis | River Bulrush | 3-7' | | X | |
| Schoenoplectus pungens | Chairmakers rush | 2-5' | | | X |
| Schoenoplectus tabernaemontani | Softstem Bulrush | 4-8' | | | X |
| Scirpus atrovirens | Green Bulrush | 3-5' | | | X |
| Forbes | | | | | |
| Acorus calamus | Sweet Flag | 1-4' | | | X |
| Alisma spp. | Water Plantain, various | 2-4' | X | | |
| Asclepias incarnata | Swamp Milweed | 3-5' | | | X |
| Bidens spp. | Bidens, various | 1-3' | X | | |
| Caltha palustris | Marsh Marigold | 1-2' | | X | |
| Eupatoriadelphus maculatus | Spotted Joe Pye Weed | 4-7' | | | X |
| Eupatorium perfoliatum | Boneset | 3-5' | | | X |
| Helenium autumnale | Sneezeweed | 3-5' | | | X |
| Hibiscus spp. | Rosemallow, various | 3-7' | | | X |
| Iris virginica shrevei | Blue Flag Iris | 2-3' | | | X |
| Lobelia cardinalis | Cardinal Flower | 2-5' | | | X |
| Lobelia siphilitica | Great Blue Lobelia | 1-4' | | | X |
| Senna hebecarpa | Wild Senna | 3-5' | | | X |
| Symphyotrichum lanceolatum | White Panicle Aster | 3-5' | | | X |
| Verbesina alternaifolia | Wingstem | 3-7' | | X | |
| Shrubs/Trees | | | Means Sold |
| Scientific Name | Common Name | Height | Bare Root | Potted | Both |
| Cephalanthus occidentalis | Buttonbush | 20' | | | X |
| Cornus alternifolia* | Alternate-Leaf Dogwood | 25' | | X | |
| Cornus obliqua* | Silky Dogwood | 3-10' | | | X |
| Cornus sericea* | Red-Osier Dogwood | 3-10' | | | X |
| Hamamelis virginiana | Witch-Hazel | 20-30' | | X | |
| Ilex verticillata | Winterberry | 20' | | | X |
| Lindera benzoin | Spicebush | 6-12' | | | X |
| Salix amygdaloides* | Peachleaf Willow | 40' | | X | |
| Salix discolor* | Pussy Willow | 20' | | X | |
| Salix interior* | Sandbar Willow | 20' | | | X |
| Salix lucida* | Shining Willow | 20' | | X | |
| Salix sericea* | Silky Willow | 4-12' | | | X |
| Sambucus canadensis | Elderberry | up to 15' | X | | |
| | | | | | |
| * Species suitable for live stakes | | | | |
Plant names based on nomenclature from USDA PLANTS database:
USDA, NRCS. 2012. The PLANTS Database (http://plants.usda.gov, 28 February 2012). National Plant Data Team, Greensboro, NC 27401-4901 USA.
Posted: 04/04/2012 by Legislative Services Agency
DIN: 20120404-IR-312120154NRA
Composed: Apr 24,2024 2:06:25PM EDT
A
PDF version of this document.