
ID.me
How to Complete the ID.me Process
A simple and secure process
Important security changes coming for payment elections. Para obtener ayuda en español llame al 1-800-891-6499.
Beginning August 3, claimants will be directed to login to their ID.me account and complete the multi-factor authentication before making an initial payment election or updating an existing payment election. You should have already created an ID.me account and verified your identity when you filed your unemployment claim. If not, you will be prompted to do so when you click the “verify with ID.me” button. If you need additional assistance please navigate to help.id.me.
The Indiana Department of Workforce Development has partnered with ID.me to create a highly secure identity verification process that ensures you, and only you, will be able to access your unemployment benefits. In just a few short steps, you’ll create your ID.me login, secure your account, and verify your identity.
What you'll need:
![]() Email Address Connected to Your Uplink Account
Email Address Connected to Your Uplink Account
![]() Social Security Number
Social Security Number
![]() Mobile Phone with Camera
Mobile Phone with Camera
![]() Valid, original Photo ID (Driver’s License, Passport, Passport Card, or State ID)**
Valid, original Photo ID (Driver’s License, Passport, Passport Card, or State ID)**
**For more details on acceptable photo IDs, please refer to the list of acceptable IDs provided in the Verify ID section.
**For more details on the technical requirements needed to verify your identity, visit this page.
Log in to your Uplink Account:
On your Home Screen, you should have a To Do for identity verification with ID.me. This To Do will have a link to ID.me to begin this process. Click on this link. You must always access ID.me through your Uplink account.
Once the link has taken you to the ID.me website you will need to set up an account. If you already have an ID.me account, you can simply sign in by clicking “Sign in to ID.me” and entering your login credentials. Otherwise, follow the steps below.
Set Up Your ID.me Account:
Step 1
To create your ID.me account, enter the email address connected to your Uplink account and choose a password. Click the checkbox to accept ID.me’s terms and conditions and privacy policy. Then, click “Create account.”

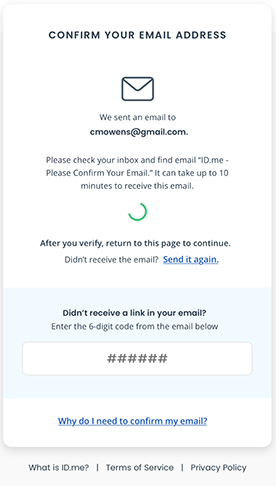
Step 2
Check your personal email inbox for an email from ID.me. Click the button in the email to confirm your email address. Then, return to your browser. The page will automatically move forward to the next step once you have confirmed your email.
Secure Your Account:
Completing this step makes your account more secure
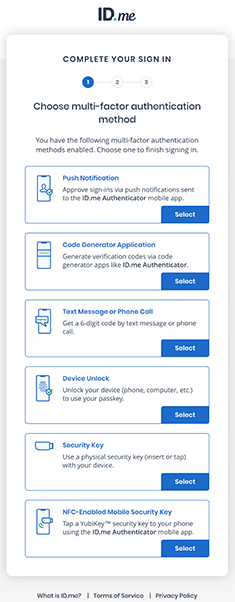
To protect your account, you will set up extra security called multi-factor authentication (MFA). MFA uses a one-time passcode that is sent to your phone or generated via a mobile app each time you log in.
Step 1
Choose an MFA option. You can receive a passcode via text message or phone call. You can also choose one of the other listed methods which use a phone app or physical key fob to securely send the passcode. Learn more about an additional MFA option, Device Unlock, by visiting this page.
Step 2
Most people choose to send the passcode to their phone. Just enter your phone number and then check your text messages or answer the phone to receive your 6-digit passcode.
Step 3
Back on your browser, enter the 6-digit passcode and click continue.
Step 4
If you want, you can generate and save a recovery code. The recovery code allows you to access your account even if you don’t have the phone or device you used to set up MFA.
Verify Your Identity:
Proving your identity is as simple as uploading a photo of your government ID and taking a selfie. By verifying your identity through ID.me, the Indiana Department of Workforce Development ensures that you, and only you, are able to receive access to your unemployment benefits. Before you begin, please review the Tips & Hints and the Top 9 Document Rejection Errors at the bottom of this page to ensure that your upload is successful. If you have additional questions, please navigate to help.Id.me and ask our virtual assistant or submit a request through the online form.
Step 1
Choose a document type to submit from the list of acceptable IDs, such as a driver’s license, state ID, passport, or passport card. Please note that:
- The ID must be valid/current
- Temporary IDs are not acceptable
- The original physical documents are required (no photocopies)
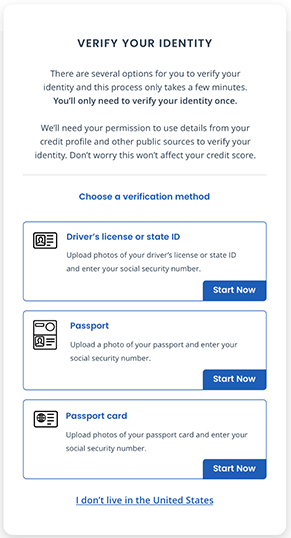
- View a full listing of acceptable forms of ID here.
Acceptable Identity Documents
- Driver’s license (or learner's permit) from a U.S. state (Paper documents are not accepted.)
- State-issued photo ID
- U.S. passport
- HSPD 12 PIV card
- U.S. passport card
- U.S. Permanent resident card (I-551)
- USCIS-issued Employment Authorization Card (I-766) (No employer-issued ID cards)
- Government Issued Photo ID (No US military ID cards. Must be a permanent document with photo. Temporary and/or paper documents are not accepted.)
- Foreign (non U.S.) passport
- Veteran’s health ID card
- Transportation Security Administration (TSA) ID Card
- DHS trusted traveler cards (Global Entry, NEXUS, SENTRI)
- Canadian driver’s license
- Certificate of Naturalization (Form N-550 or N-570)
- National ID card (only if residing outside of the U.S.)
- View a full list acceptable documents on the ID.me help page.
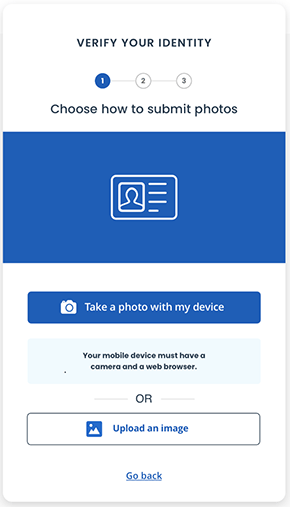
Step 2
Next, you will need to send in photos of your Identification Document. Type in the phone number of a cell phone that can take pictures. ID.me will text you a secure link that will open your phone camera. Follow the instructions on the screen once your camera is opened. For a driver’s license, state ID, or passport card, remember to take a photo of the front and back. When you are satisfied with the photos, click Continue.
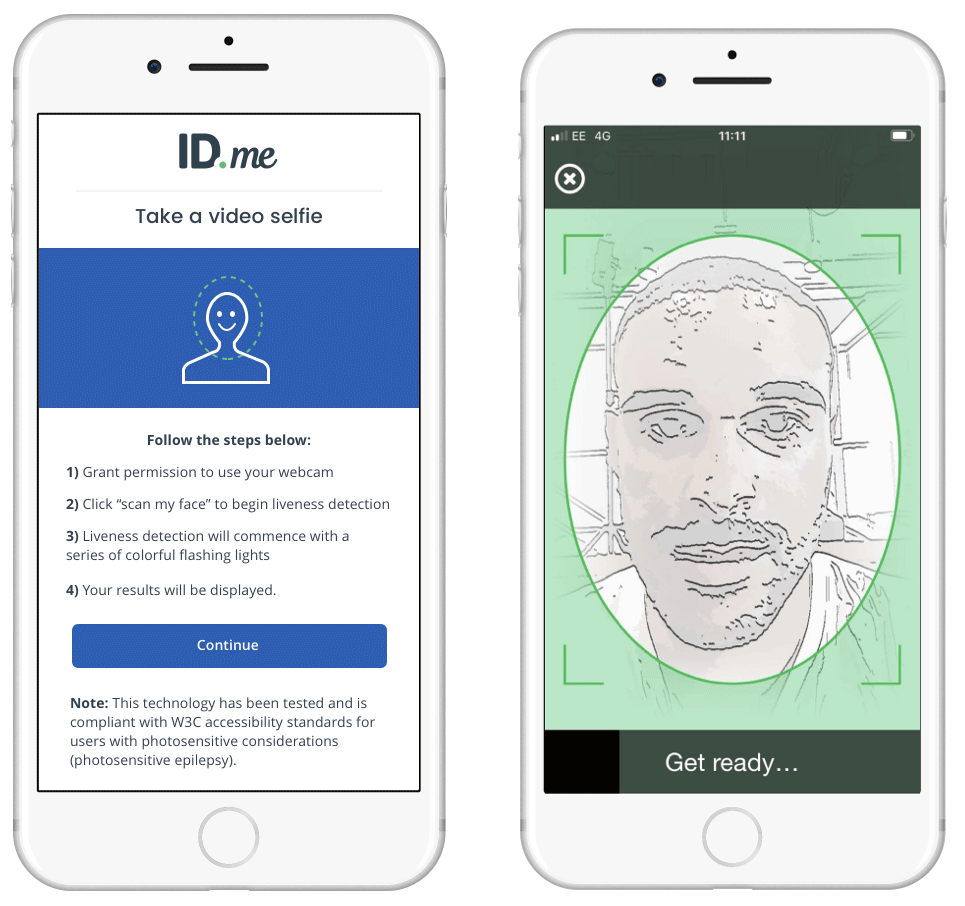
Step 3
After sending in photos of your ID, we will need you to take a video selfie using your phone’s camera feature. Ensure you are in a well-lit area before you begin. The instructions on your phone screen will lead you through the process. You will be asked to look at the colors on your phone screen while ID.me takes a short video selfie to verify that you are really you.
Step 4
The final step to verify your identity is to enter your Social Security number.
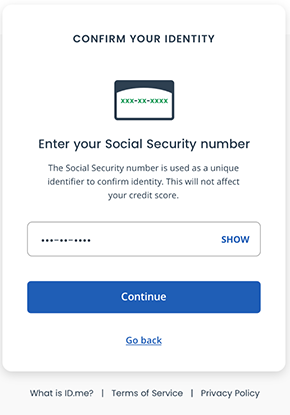
- Why does ID.me ask for this?
ID.me verifies the identities of millions of people across the world. Our primary goal is to make sure that you are who you say you are, so that you can receive access to exclusive benefits or permissions from our partners.
Sometimes, our verification process requires collecting sensitive pieces of information, like your Social Security number (SSN) or a photo of a document.
The information we ask for helps us prevent duplication, impersonation, and deception. It makes sure that your account can never be duplicated - whether accidentally by you or in a malicious attempt by someone pretending to be you. Information you provide is secured and encrypted, and is used only to facilitate verification and prevent fraud.
Confirm and Authorize
You’re almost there!
The last step is to confirm your information and authorize ID.me to securely share your identity verification information with the Indiana Department of Workforce Development. ID.me will never share your information without your permission.
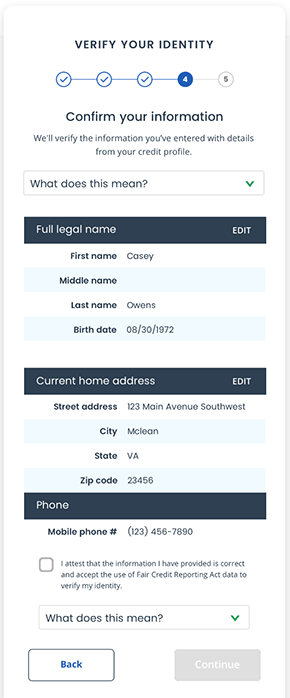
Step 1
Make sure that all your information is accurate and complete. If it is, check the box attesting that the information is accurate, and then click continue. If not, hit the edit buttons to make changes.
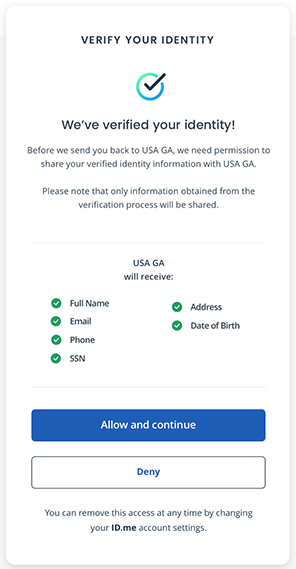
Step 2
Although you will see a message saying that your identity has been successfully verified, you MUST click on “Allow” to complete the process. Clicking on this button allows ID.me to send your information to the Department of Workforce Development who can then grant access to your account.
TRUSTED REFEREE
- Trust Referee Required Documents
Trust Referee Required Documents
IDs must be valid/current and temporary IDs can be accepted in the Trusted Referee flow if presented with the original, expired, hard copy ID that expired in the last 12 months for the same state. IDs must be the physical document—not a photocopy or scanned copy.
You will need:
- Two Primary Identification Documents, or
- One Primary and two Secondary Identification Documents.
- (Marriage certificate or legal doc if you have had a name change)
If you have additional questions, please navigate to help.Id.me and ask our virtual assistant or submit a request through the online form. Our member support team is available 24 hours a day, 7 days a week and will get back to you as soon as possible via email.
TIPS and HINTS
- Did you hit the Allow button on the final screen? This is necessary to inform DWD so that they can update your Uplink account.
Top 9 Document Rejection Errors
Individuals must upload the required documents per the instructions to pass video chat verification. To save you time getting verified, we have created a list of the most common errors we see with document upload.
1. Document Error One: Same Document Uploaded Twice
If you upload the same ID card – such as a driver’s license – as both a federal and a state ID, your documents will fail inspection. You must upload a separate document for each category in order to pass this step.
2. Document Error Two: Ineligible Secondary Document
Make sure the document isn’t damaged and illegible. You also need to make sure that a statement or bill was issued within the last 90 days. The address and name must match the other documents and your information.
3. Document Error Three: Ineligible Primary Document
The Primary Document, like a Driver’s License, must be legible and match the identity submitted. Make sure the document isn’t expired. If it is expired, check if the date falls within an expiration extension granted by the state.
4. Document Error Four: Image Does Not Match Document Selected
Users who submit documents that don’t match an accepted type will have their documents rejected. Examples include uploading an image of a Military ID, which is prohibited by federal law, or an EBT card.
5. Document Error Five: Document Uploaded is a Photocopy
Users who submit a scan or screenshot of a document will have their document rejected. Make sure you take a picture of the original document.
6. Document Error Six: Image of the Document is a Photocopy
Users who submit an image of a scanned or photocopied document will also have their document rejected. We typically see this error when users take images of photocopies of birth certificates and SSN cards.
7. Document Error Seven: Image Doesn’t Capture Full Document
Users must upload a complete image of the document. If the document is folded and information isn’t fully visible, the document will be rejected. Birth certificates are frequently rejected for not including the seal or signature.
8. Document Error Eight: Document is Expired
If a federal or state ID is expired, the document will be rejected unless the issuing authority published an extension to the expiration date. Secondary documents like utility bills must be dated within the last 90 days.
9. Document Error Nine: Front and Back of Document Required
Users who commit this error don’t upload the front and back images when required. This error is most frequently tied to driver’s licenses. We also see this error when users select the wrong category for their document.